
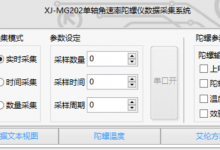
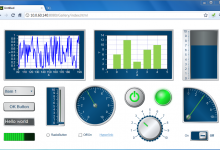
淘宝购得SRF02超声波模块,优点就是一体模块,收发一体,通过一个换能器完成,通过网上资料做了串口的一个上位机,用来实时显示超声波模块测得的距离(PS 20CM内为盲区),下面是软件的截图 用labview编的小程序,需要的可以安装试一下啊;
直接使用串口模式接到PC机上,记得串口要是TTL的 不能使232的。如果是232的 记得要转换成TTL 的:
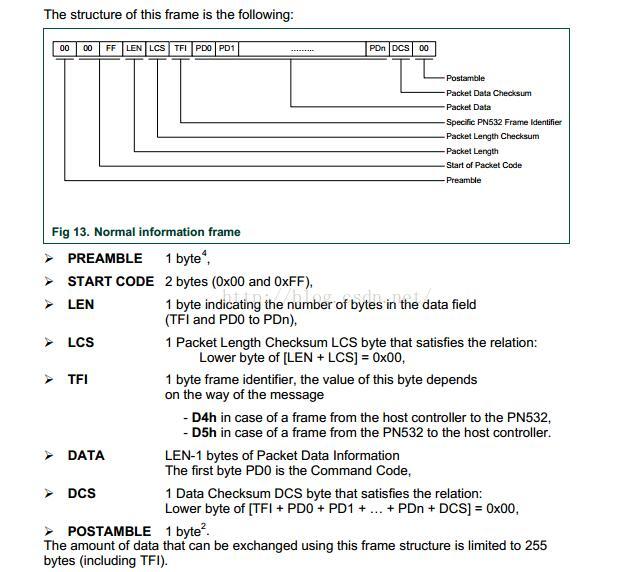
官方文档:http://www.robot-electronics.co.uk/htm/srf02tech.htm
上位机附件下载:http://pan.baidu.com/s/1gd751HD
下面是我找的一些资料 具有参考意义
- 本品为原装进口Daventech的最新型SRF02超声波传感器。专业的用户完全知道SRF系列超声波传感器的优越性能,与国产的传感器有着质的区别。不管是在性能参数、做工和工作稳定性上都是国际一流的级别。新款SRF02采用1个换能器,有效的减小了体积以及功耗。同时SRF02不但提供了I2C接口,也第一次提供了串口接口,使其能够适应更多系统架构。
- SRF02超声波模块的探测距离为15厘米-6米,大品牌的性能参数都是经过超严格的实验测定,用户可以绝对放心。绝对是一个SRF02顶多个国产同类产品。如果你的项目对超声波性能有严格要求,那么SRF系列是你的绝好选择。
- 根据我们多年机器人开发的经验,我们非常推荐在机器人项目中应用该超声波模块。通过此模块,可以获得在声纳范围内的确切的障碍物的距离。你的机器人将可以像蝙蝠一样通过声纳来感知周围的环境,只需要小小的一段代码,就可以根据障碍物的距离来精确的控制你的电机运行,从而让你的机器人可以轻松的避开障碍物。
技术规格
- 工作电压:5v
- 工作电流:4mA(典型)
- 工作频率:40KHz
- 接口类型:TTL串行接口/I2C接口
- 波束角:55度
- 尺寸:24x20x17mm(高)
- 重量:4.6g
管脚定义

- +5v Vcc: 电源管脚,接5V电源正极
- SDA/Rx:IIC模式时,IIC数据管脚;UART模式时,UART数据接收管脚
- SCL/Tx: IIC模式时,IIC时钟管脚;UART模式时,UART数据发送管脚
- Mode:通信模式选择,该引脚内部上拉至Vcc。悬空不接时,SRF02处于IIC通信模式;接到GND时,SRF02处于UART通信模式。
- 0v Ground: GND,接5V电源的地
连线图(IIC模式)

样例代码(IIC模式)
/*
Sample code for test the SRF02 with the I2C mode based on Arduino UNO!
Command for reference:http://robot-electronics.co.uk/htm/srf02techI2C.htm
Connection:
SRF02       Arduino
5v Vcc    -> 5V
SDA       -> A4
SCL       -> A5
Mode      -> no connection
0v Ground -> GND
updated by youyou.
20140418
*/
#include <Wire.h>

void setup()
{
  Wire.begin();                // join i2c bus (address optional for master)
  Serial.begin(9600);          // start serial communication at 9600bps
}

int reading = 0;

void loop()
{
  // step 1: instruct sensor to read echoes
  Wire.beginTransmission(112); // transmit to device #112 (0x70)
  // the address specified in the datasheet is 224 (0xE0)
  // but i2c adressing uses the high 7 bits so it's 112
  Wire.write(byte(0x00));      // sets register pointer to the command register (0x00)
  Wire.write(byte(0x51));      // command sensor to measure in "centimeters" (0x51)
  // use 0x51 for centimeters
  // use 0x52 for ping microseconds
  Wire.endTransmission();      // stop transmitting

  // step 2: wait for readings to happen
  delay(70);                   // datasheet suggests at least 65 milliseconds

  // step 3: instruct sensor to return a particular echo reading
  Wire.beginTransmission(112); // transmit to device #112
  Wire.write(byte(0x02));      // sets register pointer to echo #1 register (0x02)
  Wire.endTransmission();      // stop transmitting

  // step 4: request reading from sensor
  Wire.requestFrom(112, 2);    // request 2 bytes from slave device #112

  // step 5: receive reading from sensor
  if (2 <= Wire.available())   // if two bytes were received
  {
    reading = Wire.read();  // receive high byte (overwrites previous reading)
    reading = reading << 8;    // shift high byte to be high 8 bits
    reading |= Wire.read(); // receive low byte as lower 8 bits
    Serial.print(reading);   // print the reading
    Serial.println("cm");
  }

  delay(250);                  // wait a bit since people have to read the output :)
}
连线图(UART模式)

样例代码(UART模式)
/*
Sample code for test the SRF02 with the UART mode based on Leonardo!
Command for reference:http://robot-electronics.co.uk/htm/srf02techSer.htm
Connection:
SRF02       Arduino
5v Vcc    -> 5V
Rx        -> 1(TX)
Tx        -> 0(RX)
Mode      -> GND
0v Ground -> GND
Designed by youyou.
20140418
*/

void SendCmd(unsigned char address,unsigned char cmd)
{
  Serial1.write(address);//set the address of SRF02(factory default is 0)
  delayMicroseconds(100);//serial data is fixed at 9600,N,8,2,so we need some time to creat the sencond stop bit
  Serial1.write(cmd);//send the command to SRF02
  delayMicroseconds(100);//serial data is fixed at 9600,N,8,2,so we need some time to creat the sencond stop bit
}
void setup(void)
{
  Serial.begin(9600);
  Serial1.begin(9600);
  Serial.println("SRF02 TEST!");
}
void loop(void)
{
  unsigned int reading;
  SendCmd(0x00,0x51);//Real Ranging Mode - Result in centimeters
  delay(70);//time for SRF02 to measure the range
  SendCmd(0x00,0x5E);//Get Range, returns two bytes (high byte first) from the most recent ranging.
  delay(10);//wait for some time,let the Arduino receive 2 bytes data from the TX pin of SRF02
  if(Serial1.available()>=2)//if two bytes were received
  {
    reading = Serial1.read()<<8;//receive high byte (overwrites previous reading) and shift high byte to be high 8 bits
    reading |= Serial1.read(); // receive low byte as lower 8 bits
    Serial.print(reading); // print the reading
    Serial.println("cm");
  }
  delay(250); // wait a bit since people have to read the output :)
}
Arduino Leonardo的串口1让串口设备使用起来很方便。当然,如果你没有Leonardo板子,你也可以使用Arduino UNO软串口。只需要把以上代码的 “Serial1” 改成 “mySerial” ,然后在代码开头处加上这些语句:
#include <SoftwareSerial.h>  <br>
SoftwareSerial mySerial(10, 11); // RX, TX
再根据软串口管脚定义,修改Tx和Rx的连接方式。
使用软串口一样很方便,经测试可用!


好吧, 对于这些是一点也不懂的
很好,感谢!